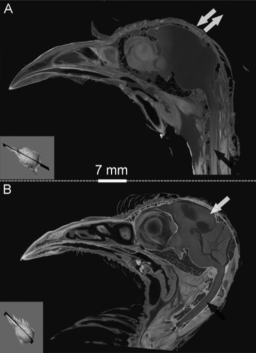
Sagittal sections of the two tinamou heads processed using I2KI-formaldehyde (A) and I2E (B), respectively. Black arrows highlight the staining effect on the spinal cord; white arrows highlight the differential penetration of iodine in the two approaches (inset 3-D renderings for each specimen show the section positions).
“I2KI-formalin (iodine-potassium iodine-formalin) treatment can obscure the natural X-ray contrast of the bone due to neighboring soft-tissues during staining of avian cephalic material. By contrast, we found the I2E (iodine-ethanol) treatment can increase the X-ray opacity of not only soft tissues (e.g., muscles), but also the bone. Mathematical simulations suggest that remarkably different results from I2E and I2KI-formalin staining are due to different partition coefficients and retardation factors of tissues, fixation effects, and distinct iodine diffusion and sorption patterns. We also found a clear positive relationship between glycogen concentration and grayscale values measured within muscle, epithelia, nervous tissues, and glands regardless of the staining solution used.”
Contrast limited adaptive histogram equalization (CLAHE) is a procedure for enhancing local contrast in an image or stack of images. In contrast to standard histogram equalization that applies single formula for enhancing contrast across the entire image, CLAHE applies multiple equalizations within partitions of an image, resulting in more localized and subtle contrast enhancements. This results in digital contrast enhancement that is not dominated by overly deep blacks or excessively bright whites.
For diceCT, CLAHE is very useful for improving edge recognition for digitally segmenting regions of interest (ROI) based on your CT data. It is particularly helpful when applied to sub-optimally stained specimens.
CLAHE is implemented in FIJI (ImageJ) and the script is available freely and openly. To perform it on a stack of CT images:
Drag and drop the folder that contains a stack of CT images into FIJI (download here: https://fiji.sc). Wait until FIJI reads in the entire image stack.
Copy the CLAHE script from the “Tips” section on the website.
In FIJI, go to “Plugins” > “New” > “Macro”. A new window will open. In the text field, paste the CLAHE script.
Select “Run”. One can specify the “block size,” “histogram bins,” and “max slope” parameters (the details of which are outlined on ImageJ.net), but I have found that the default parameters do a fine job.
Once CLAHE has gone through the entire stack, save the new image stack in a different folder to keep the original CT image stack intact (you never know when you’ll need them).
In CT data processing program of your choice (e.g., Avizo, VGStudio), read in the modified image stack.
Here is a before and after example to illustrate how CLAHE enhances diceCT images.
DiceCT, two-year old Alligator mississippiensis head in transverse views (left) unmodified, and (right) filtered using CLAHE.
CLAHE processes image stacks fairly quickly, so I recommend trying it with all diceCT image stacks. Generally, it improves edge recognition for all 3-D rendering programs, thus, greatly reducing the time spent on segmenting ROIs. As mentioned above, CLAHE is particularly useful for sub-optimally stained specimens, which is helpful when one cannot devote time or reserve frequent CT scanning sessions for checking and optimizing the stain concentration and duration.
Potential issues with CLAHE include the increase in file size associated with CT data from having both original and modified image stacks. In addition, CLAHE may accentuate unwanted artifacts like beam hardening, so there is further motivation to minimize such scanning artifacts.
Those interested in learning more about the method can visit Wikipedia and read through the original article (Zuiderveld, 1994).
**UPDATE: Also see the June 26, 2017 edition of Scientific Reports for the full study
Ingredients and Proportions:
ice-cold 4% (wt) formaldehyde (PFA) (We used freshly made solution. Also, note that commercial formalin solutions often contain methanol, which may cause shrinkage.)
4% (wt/vol) acrylamide/bisacrylamide (hydrogel monomers) (We used a pre-made solution of 38% Acrylamide and 2% Bis-acrylamide by Amresco.)
0.25% (wt) VA-044 (thermally-triggered initiator) (This one can be hard to find; we source ours from Wako Australasia.)
0.05% (wt/vol) of saponin (This is useful if you want to increase specimen permeability, or if the specimen is large.)
Mix all ingredients together. Ingredients should be kept on ice during preparation of the solution to prevent premature polymerisation.
Procedures:
(1) Incubation
Immerse specimens in hydrogel solution for 1-2 weeks at 4° C. Larger specimens should be immersed for longer, and specimen type may be important too (e.g., lizards probably take longer than tadpoles). Users should be aware that the immersion time here is longer than for the original STABILITY protocol (Wong et al., 2013). This may be due to longer fixation in formalin, which seems to use up some biomolecule binding sites.
(2) Curing
Any type of vegetable/nut/canola oil can be used for curing (approximately 3 ml). Carefully pour the oil on the surface of the hydrogel solution to form an airtight layer. Some researchers use a vacuum pump nitrogen replacement step, but we found the oil easier. The vials are placed in a water bath set at 37º C for three hours, triggering polymerisation of the gel. After polymerisation, remove excess gel (now solidified) with clean gloves and lint-free wipes, revealing the specimen as a gel/tissue hybrid. Specimens were then placed directly into iodine solution.
(3) Staining
Some potential issues: This brain was very large (~140g) and did not stain throughout; fridge staining, however, may have improved this. Also, note the high density “pockets” that occur much less frequently if staining is done in the fridge.
For staining we used 1.75% IKI solution, for about 30% longer than we would normally stain—but this depends on specimens and needs to be refined a bit more. Lower-concentration solutions may yield even less shrinkage. Aki Watanabe (pers. comm.) reported slower uptake of iodine at room temperature, which he found advantageous for a more controlled stain. We also found that staining in the fridge reduced the number of high-density “pockets” of iodine producing interference during scanning.
Stain visualization and reconstruction of specimen in 3-D, using Mimics by Materialise.
Please feel free to use our protocol. If you do so, we would appreciate a citation:
Carlisle, A., Weisbecker, V. (2016) A modified STABILITY protocol for accurate retrieval of soft-tissue data from micro-CT scans of IKI-stained specimens. Published online at https://dicect.com/2016/08/09/stability/, August 09, 2016.
Reference:
Wong, M. D., Spring, S., & Henkelman, R. M. (2013). Structural stabilization of tissue for embryo phenotyping using micro-CT with iodine staining. PloS ONE, 8(12), e84321. [doi:10.1371/journal.pone.0084321]